
Creating, Editing, or Deleting Assets

Creating, editing, or deleting assets is the same process for each of the three table types.

Creating an Asset

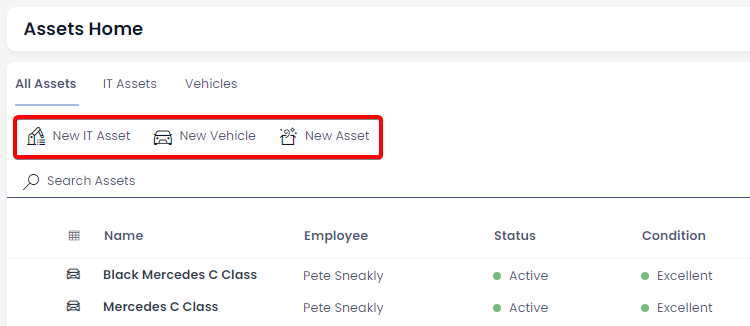
  1. On the Explorer sidebar, click Assets > Assets

A screenshot depicting how the user can navigate to the "Assets" table using the sidebar. In this example, the user has pressed the "Assets" folder, which has icon of a box with confetti inside. The user has then pressed the "Assets" table button, which has an icon of three list items.

  1. Navigate to the desired table using the tabs (Assets, IT Assets, or Vehicles)

A screenshot of the Tab Strip at the top of the Assets page. The screenshot is annotated with a red box to highlight the location of the tabs: "All Assets", "IT Assets" and "Vehicles".

  1. Click on New Asset (or New IT Asset or New Vehicle)

A screenshot of the "New X" buttons in the Command Bar at the top of the Assets page. The screenshot is annotated with a red box to highlight the location of the buttons: "New IT Asset" (which has an icon of a robot arm), "New Vehicle" (which has an icon of a car), and "New Asset" (which has an icon of a box with confetti inside).

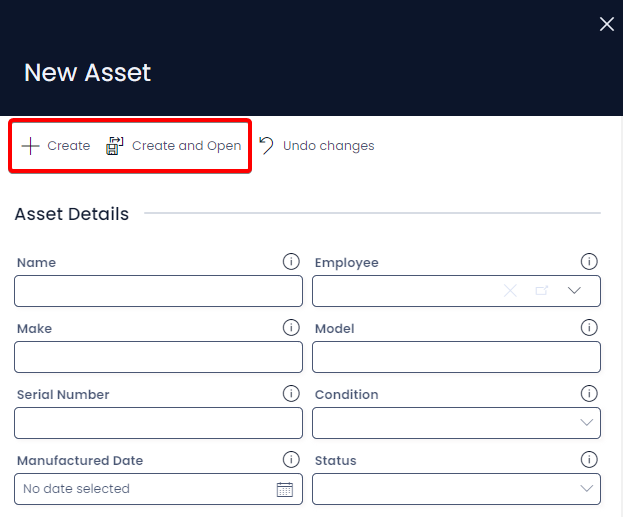
  1. Enter all relevant details. (To maintain good bookkeeping practices, it is recommended to enter as much information as possible).

    • For Vehicle Assets: Registration Expiry and Next Service Date are required fields if you wish to receive Registration and Service reminders

    • For IT Assets: Next Service Date is a required field if you want to receive service reminders

  2. Click on Create or Create and Open

A screenshot demonstrating the appearance of the "New Asset" create screen. The title of this section reads: "New Asset". The following fields are visible: Name, Employee, Make, Model, Serial Number, Condition, Manufactured Date, and Status. The screenshot is annotated with a red box to highlight the "Create" and "Create and Open" buttons at the top of the create screen.

Editing Assets

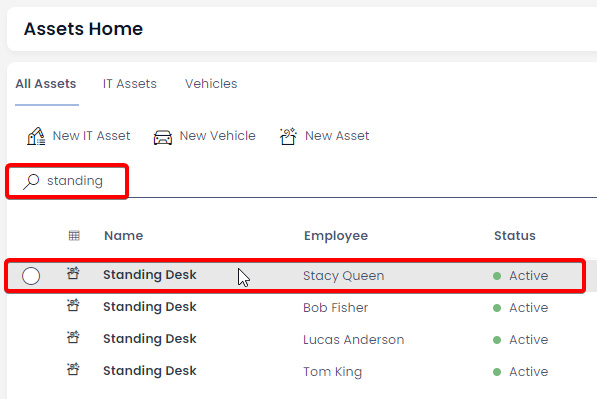
  1. Find the Asset Item you wish to edit (you can locate an asset either by scrolling through the list, or using the search bar)

A screenshot demonstrating how the user can open an asset item. The screenshot depicts the Assets data table. The screenshot is annotated with two red boxes: the first one indicates that the user has searched for the phrase "standing", to filter the table results to only show items that contain this word in their searchable columns. The second red box highlights an item row that the user is hovering over.

  1. Open the Asset Item by:

    • Clicking once on the title field of the item (this is the column with bold text)
    • Double-clicking on the item row
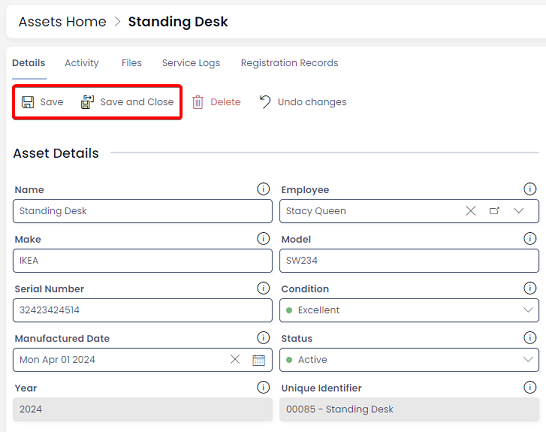
  2. Edit any relevant fields on the Asset Page as needed

  3. Click on Save or Save and Close

A screenshot demonstrating the item page for an Asset, and how to save the asset. The screenshot is annotated with a red box to highlight the "Save" and "Save and Close" buttons at the top of the Asset item page.

Deleting Assets

It is not recommended to delete an asset if it is no longer in use; instead, change its status to "inactive." This way, you can maintain a list of all your current and past assets.

However, if you need to delete an asset due to incorrect data entry or a duplicate entry, you can do so in two ways: from the list or from the item page. Deleting from the list allows you to delete multiple assets at once.

Deleting Assets via a Data Table

  1. Select the asset(s) you wish to delete by pressing their selection circles.

A screenshot demonstrating that multiple asset items can be selected via the selection circles on the far left of the item row.

Selection Circles

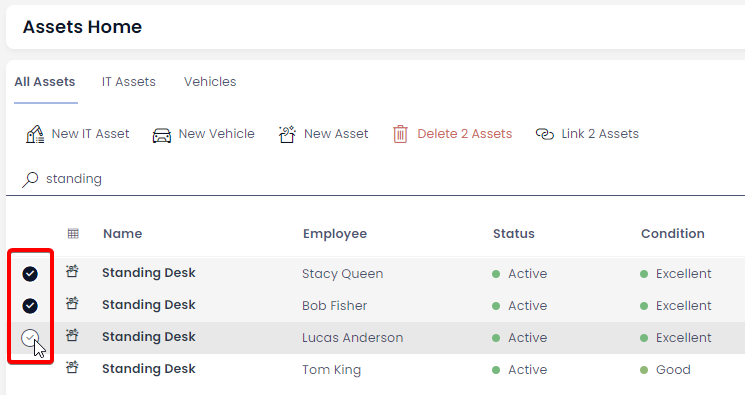
The selection circles do not appear until the mouse cursor overs over the space that they occupy.

  1. Press the Delete button

A screenshot demonstrating the appearance and location of the Delete button when selecting multiple assets. The delete button is in the Command Bar, is coloured red, and has an icon of a trash can. The button's text reads: "Delete 2 Assets", because two assets have been selected in the data table below. The screenshot is annotated with a red box to highlight the location of the delete button.

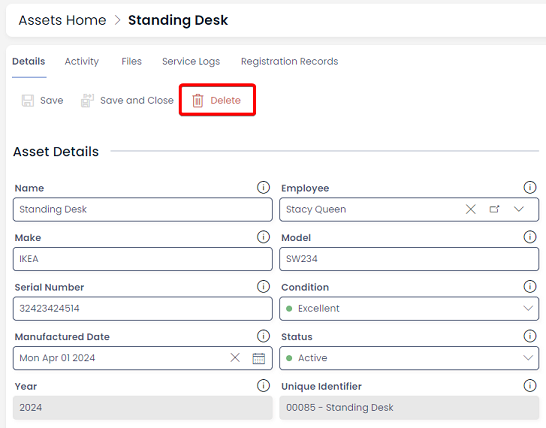
Deleting Assets via an Item Page

  1. Open the asset you wish to edit (you can locate an asset either by scrolling through the list, or using the search bar)

A screenshot demonstrating how the user can open an asset item. The screenshot depicts the Assets data table. The screenshot is annotated with two red boxes: the first one indicates that the user has searched for the phrase "standing", to filter the table results to only show items that contain this word in their searchable columns. The second red box highlights an item row that the user is hovering over.

  1. Click on the Delete button

A screenshot of an assets page that shows the location and appearance of the Delete button. The Delete button is in the Command Bar. It has a red icon of a trash can, and a red label that reads: "Delete". The screenshot is annotated with a red box to highlight the location of the delete button.

:::note[Note] When deleting assets from the base Assets List, their entries on the subtype tables (i.e., IT Assets or Vehicles) will also be deleted, and vice versa. :::